Face detection with Python using OpenCV
Detecting faces using Haar cascades, for newbies

Face detection is a computer vision technology that helps to locate or visualize human faces in digital images and also videos. This technique specifically falls under the object detection technology that deals with detecting instances of semantic objects of a certain class like humans, buildings or cars, etc. in digital images and videos.
To get into this, little knowledge of Numpy & Matplotlib will surely be helpful .Make sure that you have these two packages installed and running before installing OpenCV
pip install numpy
pip install matplotlib
OpenCV stands for Open source computer vision library, it is an open-source BSD-licensed library that includes several hundreds of computer vision algorithms. OpenCV-Python is the python API for OpenCV. You can think of it as a python wrapper around the C++ implementation of OpenCV. OpenCV-Python is not only fast (since the background consists of code written in C/C++) but is also easy to code and deploy(due to the Python wrapper in foreground).
Installation
you can install it using pip
pip install opencv-pythonHaar Cascade Classifiers is a machine learning based approach where a cascade function is trained with a set of input data. OpenCV already contains many pre-trained classifiers for face, eyes, smiles, etc. For face detection, we will be using the face classifier. Experimenting with other classifiers can improve knowledge and it’ll surely be fun. Now, let’s implement our use case using the Haar Cascade classifier for this.
We need to download the trained classifier XML file — haarcascade_frontalface_default.xml, which is available in OpenCv’s GitHub repository & Save it to your working(project) folder.
Now, let us dive straight into the process & python scripts
- import the libraries
import numpy as np
import cv2
import matplotlib.pyplot as plt
%matplotlib inline- load the input image
img = cv2.imread('picture.jpg')we shall be using the Image below:

Loading the image to be tested in grayscale because the detection works only on grayscale images. So it is important to convert the color image to grayscale.
gray = cv2.cvtColor(img, cv2.COLOR_BGR2GRAY)
Now, we need to convert it into RBG format to be able to display its true colours.
def convertToRGB(image):
    return cv2.cvtColor(image, cv2.COLOR_BGR2RGB)
Loading the classifier for frontal face
cascade_faces = cv2.CascadeClassifier('haarcascade_frontalface_default.xml')We shall be using the detectMultiscale module of the classifier. This function will return a rectangle with coordinates(x,y,w,h) around the detected face.
faces = cascade_faces.detectMultiScale(gray, 1.1, 4)Drawing rectangle around the detected faces
for (x, y, w, h) in faces:
 cv2.rectangle(img, (x, y), (x + w, y + h), (255, 0, 0), 2)
Displaying the output
cv2.imshow('img', img)
cv2.waitKey()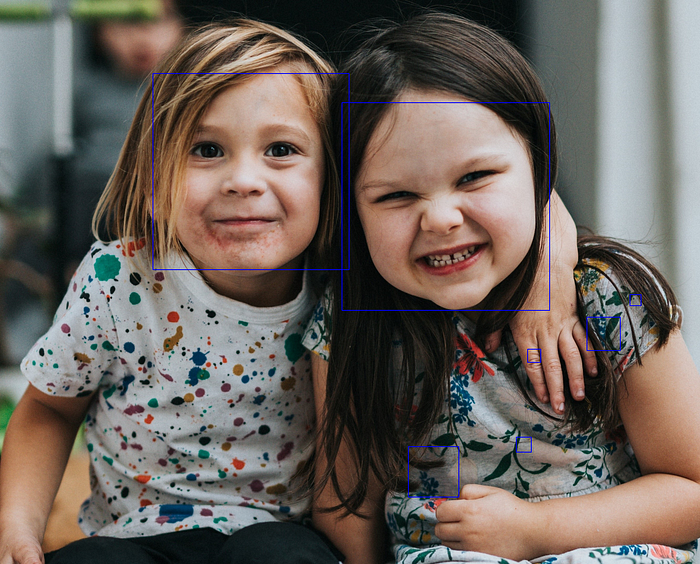
check out the code in a easier way here :
Sometimes the program will not be able to properly detect some faces. The reason is for haar cascade classifier to work properly, the face should be properly visible.
The face detection can also be performed on videos as well, it’s like performing this for each frame in the video, the video can either be the input or from the web camera.
check out this code:
import cv2# Loading the cascade
face_cascade = cv2.CascadeClassifier('haarcascade_frontalface_default.xml')# To use a video file as input
# cap = cv2.VideoCapture('filename.mp4')
# To capture video from webcam.
cap = cv2.VideoCapture(0)while True:
    # Read the frame
    _, img = cap.read()# Converting to grayscale
    gray = cv2.cvtColor(img, cv2.COLOR_BGR2GRAY)# Detecting the faces
    faces = face_cascade.detectMultiScale(gray, 1.1, 4)# Drawing the rectangle around each face
    for (x, y, w, h) in faces:
        cv2.rectangle(img, (x, y), (x+w, y+h), (255, 0, 0), 2)# Display
    cv2.imshow('img', img)# Stop if escape key is pressed
    k = cv2.waitKey(30) & 0xff
    if k==27:
        break

# Release the VideoCapture object
cap.release()
Conclusion
This is how the face detection works and it is also easy to learn all other object detection techniques in the same way, there are many more cool ways to detect objects, this is the one which is extremely easy.
Hope you found this useful, Thank you.
Find the code here: https://github.com/Retheshgoud/FaceDetection_OpenCV
email: rethesh.goud7@gmail.com